6 December 2012
21 November 2012
RIBOLLITA
The first time I had Ribollita was in Florence at Il Latino - a MUST if you go to Florence, and not only because of their Ribollita! :-) I was expecting a soup and was surprised about its thick and stewy consistency (there's a picture on their website). This is because a large portion of the cooked vegetable and beans are pureed, and also at the end the bread is left to dissolve inside the soup. Needless to say, it was absolutely delicious and we actually had it on two occasions during our short stay. It is so hearty and tasty, and the slight bitterness of the black kale = 'cavolo nero' is just exquisite. Ribollita, like many superb dishes, is originally a peasant dish and was traditionally made on Fridays to use up the week's left-overs. Because of this, there are endless variations. But as long as they contain beans, two kinds of cabbage or kale and bread they can be called Ribollita. Also, 'ri-bollita' means 're-heated', as the soup is first prepared and then reheated on the next,
12 November 2012
MATCHA (GREEN TEA) SHORTBREAD
Scotland meets Japan: Shortbread biscuits with a spicy, powdery green tea look and flavour. Like all things Matcha, these biscuits are a real treat. They are made with a considerably large amount of Matcha tea powder, but it is really worth it as you end up with lots of tasty biscuits. One thing I wanted to try, in addition to the original recipe and remembering what a difference it made to the GREEN MATCHA TEA ICE CREAM, but then unfortunately I forgot in the end, was to add a pinch of salt to the dough, bringing out even more the Matcha flavour.
My biscuits were not as green once they were baked as the ones in the original recipe. I read afterwards that this might have had to do with the fact that they browned a bit too much. It says to bake them until they slightly brown at the edges, but I think it might have taken a bit of the colour and taste away. This can apparently be avoided by putting them on a double baking tray, but in this case I am not sure if the actual baking time will need to be increased. In any case, they were delicious and no wonder that Amai won a prize for 'Best Bakery Recipe'. I saw several bloggers mention these biscuits in their blogs
1 November 2012
CHICKEN TIKKA MASALA
Naturally, being Austrian I am no expert in Indian cuisine - well no expert in any cuisine for that matter... :-) But with Indian food I feel a lot more insecure, as I don't know how all the spices work and come together, or more precisely, if it does not taste right, which spice is missing or too much.
Needless to say, I was intrigued and tried a couple of Tikka Masalas before, but they just didn't taste at all like I wanted them to taste, and I ended up with a lot of spices I had no further use for. So after these couple of attempts it was very clear that Indian restaurants and take-aways were the only real satisfactory answer for me. Until I received this recipe! It was a dinner invitation and my hosts, judging by the beautiful and delicious dinner we had, were a lot more knowledgeable in cooking Indian food. I got to watch in the kitchen
FRAGRANT PILAU RICE
At home in Austria when we make rice for WIENER SCHNITZEL we add half an onion to the rice during cooking, peeled but uncut, and spiked with several whole cloves. The rice is then simmered very slowly until all water has been absorbed, by which time the rice is done and the aroma of the added onion and cloves have deeply penetrated into the rice with their warm and sweet flavour. This rice is similar in the way it is prepared and flavoured, but of course the type of rice is different and also the spices: the spicy warmth of cinnamon, the sweet cloves, the herbal flavour of bay leave, the citrussy cardamom,
Labels:
Indian,
Rice,
Side dish,
Vegetarian
20 October 2012
16 October 2012
A RHAPSODY IN ORANGE - PUMPKIN SOUP
Autumn, and the shops and markets are full of the most beautiful colourful pumpkins. They come in so many shapes and sizes and are just so great to look at. And surprising to learn that apparently they are not vegetable but fruit...? It's strange as we tend to think of fruit as sweet, but it has to do with the fact that they are fleshy and grow around a plant seed. It would definitely explain their vibrant colours. I lately came across this so called 'turban pumpkin'. It is so unusual with the additional stripy part on top (or is it the bottom?). Still googling what to make with it, but I am in no rush, as it's nicely decorating our kitchen.
Labels:
Autumn,
Easy,
Soup,
Vegetarian
16 September 2012
ZWETSCHGENFLECK - AUSTRIAN PLUM CAKE - WITH AND WITHOUT STREUSEL
Prunes or plums... and how are you supposed to know the difference? Not even the WWW had a satisfactory answer to offer. This cake is originally called 'Zwetschgenfleck' or 'Zwetschgendatschi', with 'Zwetschgen' meaning prunes or plums, and 'Fleck' meaning a flat tray bake. 'Datschi' comes from 'datschen' that I think means something like 'to press inside', as the dough is pressed inside the tray, or the plums are pressed inside the dough. 'Streusel' is the German word for crumble. But as for prunes versus plums: in Austria the word for plums is 'Pflaumen', but we hardly use it. I would call anything plum, and 'Pflaumen'-like a 'Zwetschge', which I thought is a 'prune'. But, in English 'prune' apparently stands for a dried plum, but that is the one thing in Austria we call Dörrpflaume (= dried 'plum') and not Dörrzwetschge!) :-) To add to the confusion, in Belgium plums in general
Labels:
Austrian,
Cake,
Fruit,
Summer,
Vegetarian
8 September 2012
LEMON POLENTA CAKE
Buttery, lemony, nutty, fresh, sweet and moist. A crumbly grainy texture, and absolutely no flour! Sooooo nice! :-) I think this cake is originally Italian, but I saw Nigella Lawson make it so wanted to try her Anglo-Italian version. I followed the instructions to the T, but leaving (forgetting) the cake for 40 minutes in the oven while having dinner. When all of a sudden (well luckily) the timer went off it was pretty brown on the top. Although that did not make it look so great, it actually had not done it any harm, especially with the lemon syrup poured over. I read up on other recipes meanwhile and they recommended a lower temperature or to cover it after app. 30min to avoid too much browning. The cake had sunk quite a bit in the middle, and although I poured the lemon syrup slowly from the outside, it accumulated in the centre creating a moist lemony sponge in the middle. The cake is quite grainy and the first piece was difficult to cut and serve, but after a couple of hours, and due to the syrup I guess, it became more compact. Made for the first time, but definitely one we will repeat often :-)
For the Cake:
200g unsalted butter, soft, and some for greasing
200g caster sugar
200g ground almonds
100g polenta
2 tsp baking powder
3 medium eggs
zest of 2 medium lemons
For the Syrup:
Juice of 2 lemons
125g icing sugar
I used a 22cm cake tin. I guess a smaller one (20cm) would also be fine and produce a cake a little higher.
Pre-heat the oven to 180°C/160°C fan/ gas mark 4.
Line the base of the cake tin with baking paper, then grease the sides with the soft butter. Put the almonds, polenta and baking powder into a bowl and mix together.
Put the butter and sugar into a second bowl and cream until pale and fluffy - or let Kitchenaid do the work for you.
Whisking continuously, add app. ¼ of the flour polenta mixture to the butter mixture. Then add the first egg and mix in well, followed by the second ¼ of the polenta, the second egg, etc, alternating the ingredients and beating all the time until all ingredients are incorporated. This is important as it prevents the mixture from curdling. Add the lemon zest to the mixture and stir well. Pour the mixture into the prepared cake tin and bake in the pre-heated oven for app. 40 mins, making sure that the surface does not get too brown. If necessary finish baking the cake covered with Alu foil.
Once baked, the cake might seem a little moist but if a wooden skewer comes out clean it is fully cooked. Also at this point it will have started to shrink away a little form the sides of the tin. Leave the cake to cool inside the tin on a wire rack. For the syrup put the lemon juice and icing sugar into a small saucepan and bring to the boil until the sugar is fully dissolved. Prick the top of the cake many times with an unboiled spaghetti, then pour the warm syrup over the cake. Leave to cool completely before removing the cake from the tin.
________________________________________________________
LEMON POLENTA CAKE
For the Syrup:
4) Prepare the lemon: Zest the lemon, then squeeze out the juice.
5) Cream the butter and sugar: Put the butter and sugar into a second bowl and cream until pale and fluffy.
6) Add polenta mixture and eggs: Whisking continuously, add app. ¼ of the flour polenta mixture to the butter mixture. Then add the first egg and mix in well, followed by the second ¼ of the polenta, the second egg, etc, alternating the ingredients and beating all the time until all ingredients are incorporated. This is important as it prevents the mixture from curdling. Add the lemon zest to the mixture and stir well.
7) Bake: Pour the mixture into the prepared cake tin and bake in the pre-heated oven for app. 40 mins, making sure that the surface does not get too brown. If necessary finish baking the cake covered with Alu foil. Once baked, the cake might seem a little moist but if a wooden skewer comes out clean it is fully cooked. Also at this point it will have started to shrink away a little form the sides of the tin. Leave the cake to cool inside the tin on a wire rack.
8) Make the sirup: Put the lemon juice and icing sugar into a small saucepan and bring to a boil until the sugar is fully dissolved.
9) Pour the sirup over the cake: Prick the top of the cake many times with an unboiled spaghetti, then pour the warm syrup over the cake. Leave to cool completely before removing the cake from the tin.
10) Serve: Dust with a little icing sugar to hide all the little holes. Cut into wedges and serve.
Put the butter and sugar into a second bowl and cream until pale and fluffy - or let Kitchenaid do the work for you.
Whisking continuously, add app. ¼ of the flour polenta mixture to the butter mixture. Then add the first egg and mix in well, followed by the second ¼ of the polenta, the second egg, etc, alternating the ingredients and beating all the time until all ingredients are incorporated. This is important as it prevents the mixture from curdling. Add the lemon zest to the mixture and stir well. Pour the mixture into the prepared cake tin and bake in the pre-heated oven for app. 40 mins, making sure that the surface does not get too brown. If necessary finish baking the cake covered with Alu foil.
Once baked, the cake might seem a little moist but if a wooden skewer comes out clean it is fully cooked. Also at this point it will have started to shrink away a little form the sides of the tin. Leave the cake to cool inside the tin on a wire rack. For the syrup put the lemon juice and icing sugar into a small saucepan and bring to the boil until the sugar is fully dissolved. Prick the top of the cake many times with an unboiled spaghetti, then pour the warm syrup over the cake. Leave to cool completely before removing the cake from the tin.
________________________________________________________
LEMON POLENTA CAKE
For the Cake:
200g unsalted butter, soft, and some for greasing
200g caster sugar
200g ground almonds
100g polenta
2 tsp baking powder
3 medium eggs
zest of 2 medium lemons
For the Syrup:
Juice of 2 lemons
125g icing sugar
Also: a 22cm cake tin.
1) Pre-heat the oven to 180°C/160°C fan/ gas mark 4.
2) Prepare the cake tin: Line the base of the cake tin with baking paper, then grease the sides with the soft butter.
3) Mix the dry ingredients: Put the almonds, polenta and baking powder into a bowl and mix together.
4) Prepare the lemon: Zest the lemon, then squeeze out the juice.
5) Cream the butter and sugar: Put the butter and sugar into a second bowl and cream until pale and fluffy.
6) Add polenta mixture and eggs: Whisking continuously, add app. ¼ of the flour polenta mixture to the butter mixture. Then add the first egg and mix in well, followed by the second ¼ of the polenta, the second egg, etc, alternating the ingredients and beating all the time until all ingredients are incorporated. This is important as it prevents the mixture from curdling. Add the lemon zest to the mixture and stir well.
7) Bake: Pour the mixture into the prepared cake tin and bake in the pre-heated oven for app. 40 mins, making sure that the surface does not get too brown. If necessary finish baking the cake covered with Alu foil. Once baked, the cake might seem a little moist but if a wooden skewer comes out clean it is fully cooked. Also at this point it will have started to shrink away a little form the sides of the tin. Leave the cake to cool inside the tin on a wire rack.
8) Make the sirup: Put the lemon juice and icing sugar into a small saucepan and bring to a boil until the sugar is fully dissolved.
9) Pour the sirup over the cake: Prick the top of the cake many times with an unboiled spaghetti, then pour the warm syrup over the cake. Leave to cool completely before removing the cake from the tin.
10) Serve: Dust with a little icing sugar to hide all the little holes. Cut into wedges and serve.
Labels:
Cake,
Dessert,
Easy,
English,
Glutenfree,
Italian,
Vegetarian
1 September 2012
MOROCCAN LAMB TAJINE WITH PRUNES AND APRICOTS
Labels:
Lamb,
Main Course,
Meat,
Moroccan
24 August 2012
SPUDS A LITTLE LESS ORDINARY: HASSELBACK POTATOES
Crispy fried, or soft baked potatoes? Why decide when you can have both: a soft and tender centre with a crispy potato fan. And don't they just look the part? They are called 'Hasselback' or 'Accordion' Potatoes, named after the Swedish Restaurant 'Hasselbacken' in Stockholm, where they were first served. They can be a main meal, side dish or snack. But, once cooked, don't leave them out on the kitchen counter as this is dangerous ground for them. Especially when they are bite-size like mine... and especially when everyone is hungry... and especially when you make them for the first time and everyone is asking: 'what are these? Can I try one (eleven)?' They fit too easily into ones fingers and mouth,
23 August 2012
BAVARIAN POTATO SALAD
Bavarian potato magic... This Potato salad brings back so many fond memories of Munich: of Beer gardens, Oktoberfest, Pretzels, O'batzda, Schweinsbraten, Leberkäs', just to name a few... none of those to be found here in Brussels of course... Actually that's not entirely true, as every two years after the Munich Oktoberfest one of the Oktoberfest tents comes to Brussels for a couple of nights - just one tent for all the German and other Expats... and us, of course... :-) With all the original beer and food, big Pretzels, music, and the traditional big mess. But such fun, and we look forward to the next in 2013... This potato
19 August 2012
DRAGON ARCTIC ROLL WITH MALTESERS
Soft and tender chocolate-marbled cake with a heart of slowly melting ice-cream, a combination only to be topped with crunchy Maltesers... as if it needed topping... ;-) Summer cake heaven... Did I say Summer? Anytime cake heaven! Summer unfortunately turned out not to be great for blogging, with a lot of recipes and photos unposted - not due to lack of food though, if I may say... So, trying to catch up, only this time hiding inside for once, not from the rain, but the scorching heat - 36°C today. But must not complain, as this is Belgium, and 17°C, I fear, will descend back on us any time soon. I saw Jamie Oliver make this roll a while ago in one of his Jamie's Great Britain programs,
11 July 2012
PRAWNS (WITH 'SWANS') IN FILO PASTRY
I have created a habit, especially after a long working day, of googling the combination of ingredients I find in my kitchen cupboards, fridge and freezer and see if the result looks appealing, is fast to make, and most of all, if I can get away with not having to rush to the shops to join the late check-out queues... And maybe even more important, if what I find will make that last minute effort not too obvious at the dinner table, where all food is supposed to be 'made with love', even if it was a total craze for me to get it on the table, and I look like I just came out of a storm, albeit with a wide and proud smile on my face... And how appealing these did look! Well, anything wrapped in, or layered between
10 July 2012
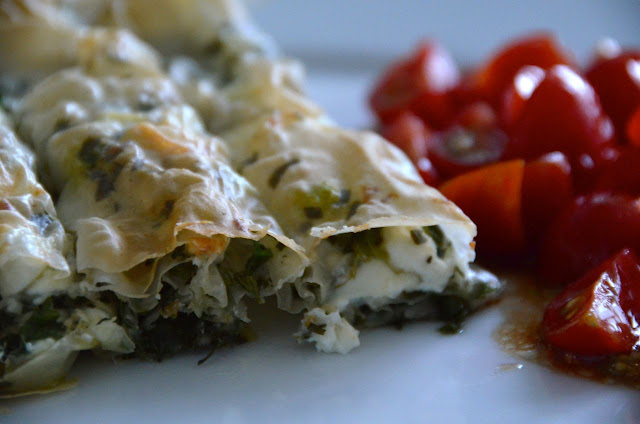
FETA CHEESE AND HERB STRUDELS
These Strudels are different from the usual Feta & Spinach Strudels as they are filled only with Feta, parsley and chives, and also they are small, individual Strudels. The taste and aroma of the two herbs perfectly compliment the cheese and keep the Strudels light and fresh, but at the same time add tremendous flavour.
They are so easy and quick to make and bring home a taste of holiday, summer and sun even without leaving home.
I would normally calculate two to three Strudels per person as a main dish, or one as a starter, served with a simple tomato salad made with olive oil, balsamic vinegar and red onions. We tend to take the Strudels and salad together on our plates rather than on two separate plates, and this way the vinaigrette becomes a perfect dipping sauce for the Strudels... must be tried to be appreciated... :-)
6 July 2012
BEAN, POTATO, TUNA AND EGG SALAD
This is an Italian salad ('Insalata di Fagiolini, Patate, Tonno e Uova') we make quite often in the summer - but be warned, it's not one for the faint-hearted (well faint-nosed in this case). Beans, tuna, eggs and onions, four ingredients strong in taste and smell, and the combination works exceptionally well, especially with the potatoes as a neutral foundation and bringing all ingredients together. A fantastic fresh and cool summer lunch or evening meal with tons of textures and flavours.
29 June 2012
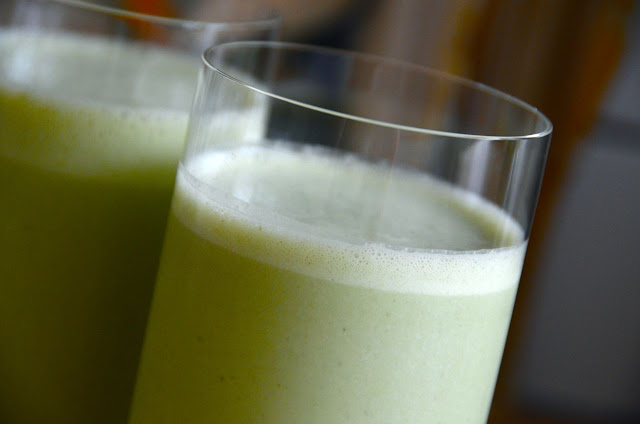
GREEN MATCHA TEA AND BANANA SMOOTHIE
Green, sweet, smooth, and with a subtle bitter green tea flavour - my favourite breakfast treat these days. I have been making smoothies for a long time. At the beginning mostly with fruit, on the basis of apples and orange juice, and then adding different fruit for different flavours on a daily basis. Then I discovered rice milk that I prefer to the acidic packaged fruit juices. Until I received a new kitchen machine with a coffee grinder, and now I grind good quality oats into fine powder and add it to the rice-milk based smoothies. This way I have a full breakfast, plus the added oats makes the smoothies even
27 June 2012
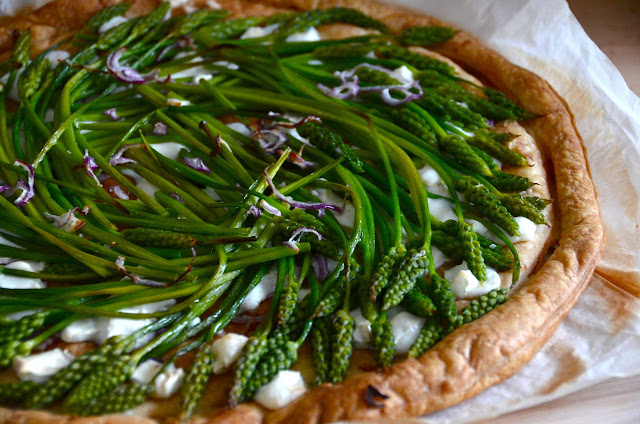
WILD ASPARAGUS AND GOATS CHEESE TARTE
Wild asparagus - almost too beautiful to eat! You want to put them in a vase and just admire them instead. They look a bit like Hyacinths in green and apparently come from the same plant family. I just happened to spot them while shopping for vegetables. There was only one bunch left, and it had my name on it ;-) Apparently they are quite common here in Belgium and also France, but I had seen them for the first time and never eaten them before. Wild asparagus is a lot more delicate and mild than normal asparagus and I wanted to make them taste in their own right and keep their beautiful look. In the end I decided to make a simple tarte, adding just a little goats cheese and a small amount of
25 June 2012
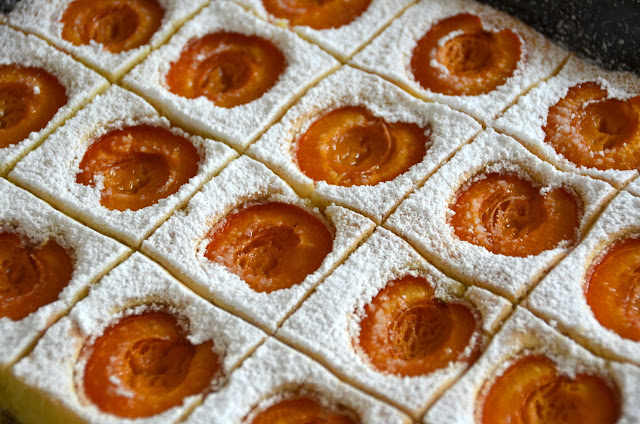
AUSTRIAN 'OBSTFLECK' - APRICOT TRAY BAKE
A quick and easy every-day cake, delicious, fresh and light, and best with stone fruit such as apricots, plums or cherries. Or even with grated apples. It's the combination of sweet and fluffy cake and lightly sour fruit, plus the fact that there is actually a lot of fruit, that makes this such a great summer cake. I always find that apricots, or 'Marillen' as we call them in Austria, are something so typical for Austria, just to think of the famous Marillenknödel (apricot dumplings) or 'Marillenschnaps', an apricot-flavoured brandy in a
Labels:
Austrian,
Cake,
Fruit,
Quick'n Easy,
Sweet,
Vegetarian
20 June 2012
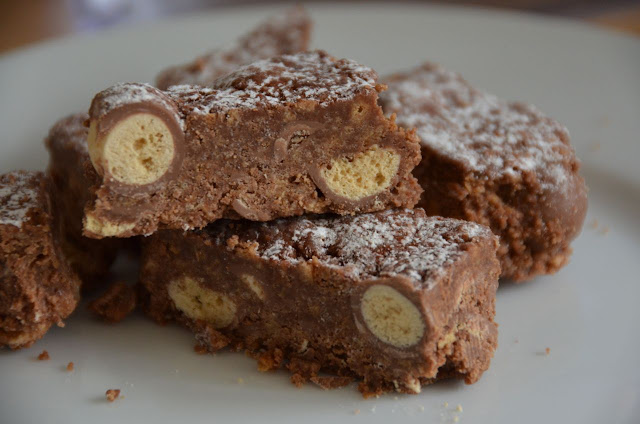
MALTESER TRAY BAKE
EUPHOOOOORIAAAAA!!! :-) What's more seductive than Maltesers and Chocolate? Maltesers AND Chocolate AND Digestive biscuits ALL IN ONE BITE! :-) And I am sure the piece in the picture had two eyes, winking at me, saying 'Eat me, eat me'... Needless to say I did, right after the picture was taken... I had this as dessert for the first time a couple of weeks ago at my friend Helen's in England - thank you for an unforgettable evening and weekend - and was immediately hooked. But would I have to dedicate this post to somebody, it would have to be not only to them, but also to Ali & John B., and they would know exactly why :-) I've been dreaming about this cake ever since, and finally 'gave in' when I needed a last minute contribution for an invitation last weekend.
Labels:
Cake,
English,
Quick'n Easy,
Sweet,
Vegetarian
1 June 2012
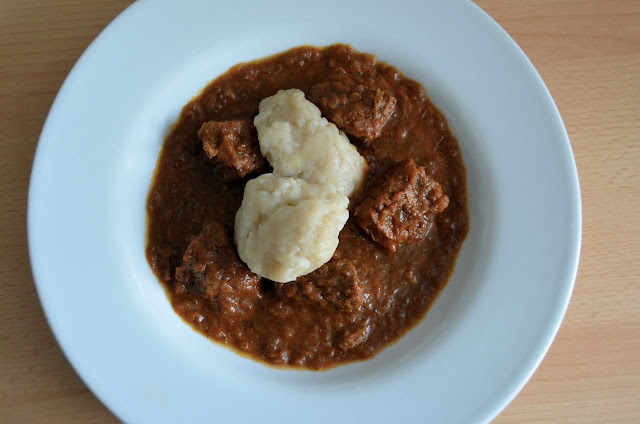
SAUSAGE AND PORCINI SAUCE
Comfort food at its best :-) I believe this recipe is an adaptation from the Italian 'Pasta alla Norcia', a dish traditionally made in Umbria/Italy with Umbrian pork sausages and mushrooms or black truffle. This one's with Porcini mushrooms instead of truffles, but due to the strong taste of the porcini and sausages and the white wine, it is fantastic in flavour and a perfect companion to fresh HOME-MADE POTATO GNOCCHI. I slightly adapted Signor Caldesi's recipe using less oil but more white wine, as I really like the flavour of white wine in food and it also cuts through the richness of the sauce. I used single cream rather than double cream and added a pinch of nutmeg to go with the earthy flavours of
30 May 2012
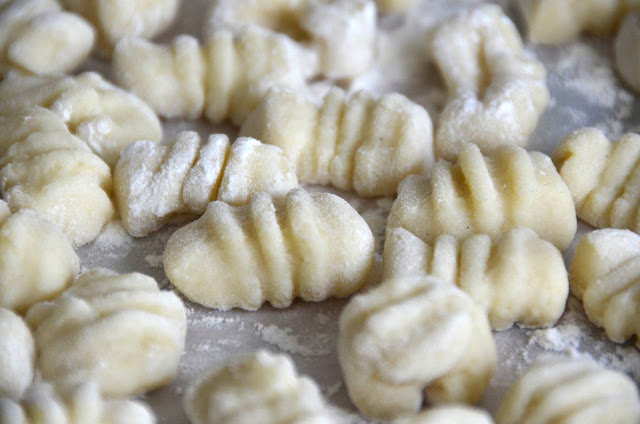
HOME-MADE POTATO GNOCCHI
One word: IRRESISTIBLE! They were meant to be a one-off, but surely did not stay that way. This must be the fourth time I have made them, and I can't see myself purchasing their plastic-wrapped, now clearly in the deepest shadow, Supermarket cousins anytime soon. Yes, they may be time-consuming and quite a bit of an effort, and the shaping requires a little practice, but it's not all that difficult, even for my unskilled non-Italian hands. One batch offers plenty of practice, and in the end the quality makes really up for it. Also, freshly made and frozen they turn into a perfect quick mid-week evening meal, especially as they can be cooked straight from frozen, needing just a couple of more minutes cooking time. A great companion for home-made PESTO ALLA GENOVESE, a simple Tomato Sauce, or my favourite: SAUSAGE AND PORCINI SAUCE.
Ingredients based on: Giancarlo Caldesi: How to Make Gnocchi
(Signor Caldesi does not show how to shape his Gnocchi into the traditional form unfortunately, so more of that below. I also replaced the pepper with nutmeg)
1kg starchy potatoes (I read that red starchy ones are best as they hold the potato better in the skin during boiling and are more tasty, but I used normal white starchy ones for this recipe. Just make sure not to overcook them until their skin bursts)
300g '00' flour + additional for dusting
1 large egg
1 tsp salt
freshly grated nutmeg
additional salt for boiling
Boil the potatoes:
Wash the potatoes, then place them unpeeled in a large pot and cover with cold water - it is important to use cold water as the potato skins may split if they are put immediately into boiling water. Bring to the boil, then reduce the heat and cook the potatoes gently until they are soft and can be easily pierced with a skewer or knife. The potatoes should fall off the skewer after piercing, if they hold on, more cooking is needed. Drain the potatoes, then, holding the potatoes with a kitchen towel to protect the hand from burning, peel the skins off with a small knife while still hot. Make the dough immediately following the steps below.
Make the dough:
Leave the riced potatoes to cool just a little, then add the egg and stir in quickly in order for the egg not to start cooking from the heat of the potatoes. Season with the salt and some freshly grated nutmeg and stir. Add some of the flour and start to stir gently into a dough-like texture, then put the mixture onto a work surface.
Add the remaining flour, little at a time, and knead very gently into a soft, smooth dough. Try not to overknead and handle too much as the dough will become more sticky and require even more flour. If the flour sticks to the work surface, use a dough scraper to scrape off the sticky bits and knead them back into the potatoes. The final flour amount depends on the type of potatoes used, the size of egg, etc. The dough should be smooth and very soft.
Shape the Gnocchi:
Cut off a small piece of dough with a dough scraper or a knife. Dust the work surface, then roll the dough piece into a long rope, app. 2cm thick. Cut the rope into 2 cm pieces.
Gnocchi are often served just like this, but I prefer them with the proper pattern and shape as they soak up a lot more sauce. To do this, flour hands, then take each Gnocchi one-by-one, place into a little flour and roll into a small ball. Then roll over the tines of a fork to make the typical Gnocchi pattern and shape: to do so, hold the fork with one hand, tip of the tines leaning on the work surface, and concave side up, at a slight angel to the surface. Put the tip of your thumb into flour, then place one Gnocchi on the top of the tines. Roll the Gnocchi downwards with the tip of your thumb, applying little pressure.
The Gnocchi will start to flatten a little underneath the thumb, but through the downward movement will also start to roll around the tip of the thumb in a circle-like motion into a C-shape. You want to end up with a small cavity inside the Gnocchi and the typical pattern created by the ridges on the other side. The picture shows it a bit extreme and the opening does not need to stay like this, normally the rolling movement closes the Gnocchi, or it can be pressed together a little at the end. I did shoot a couple of pictures to show this in more detail, but my thumb stuck inside the gnocchi was no real eye-candy ;-)
Put the Gnocchi onto a surface dusted with flour. Repeat with the remaining dough balls until all Gnocchi have been shaped. This does need a little practice, but there's plenty of that with 1kg of potatoes... and they don't need to be all perfect and identical, they still taste nice :-)
Make the dough:
Put the peeled potatoes through a potato ricer - this will incorporate air, making the potatoes even fluffier. It is important that these initial steps are done very quickly, as the hotter the potatoes, the softer the Gnocchi will be.
Leave the riced potatoes to cool just a little, then add the egg and stir in quickly in order for the egg not to start cooking from the heat of the potatoes. Season with the salt and some freshly grated nutmeg and stir. Add some of the flour and start to stir gently into a dough-like texture, then put the mixture onto a work surface.
Add the remaining flour, little at a time, and knead very gently into a soft, smooth dough. Try not to overknead and handle too much as the dough will become more sticky and require even more flour. If the flour sticks to the work surface, use a dough scraper to scrape off the sticky bits and knead them back into the potatoes. The final flour amount depends on the type of potatoes used, the size of egg, etc. The dough should be smooth and very soft.
Shape the Gnocchi:
Cut off a small piece of dough with a dough scraper or a knife. Dust the work surface, then roll the dough piece into a long rope, app. 2cm thick. Cut the rope into 2 cm pieces.
Gnocchi are often served just like this, but I prefer them with the proper pattern and shape as they soak up a lot more sauce. To do this, flour hands, then take each Gnocchi one-by-one, place into a little flour and roll into a small ball. Then roll over the tines of a fork to make the typical Gnocchi pattern and shape: to do so, hold the fork with one hand, tip of the tines leaning on the work surface, and concave side up, at a slight angel to the surface. Put the tip of your thumb into flour, then place one Gnocchi on the top of the tines. Roll the Gnocchi downwards with the tip of your thumb, applying little pressure.
The Gnocchi will start to flatten a little underneath the thumb, but through the downward movement will also start to roll around the tip of the thumb in a circle-like motion into a C-shape. You want to end up with a small cavity inside the Gnocchi and the typical pattern created by the ridges on the other side. The picture shows it a bit extreme and the opening does not need to stay like this, normally the rolling movement closes the Gnocchi, or it can be pressed together a little at the end. I did shoot a couple of pictures to show this in more detail, but my thumb stuck inside the gnocchi was no real eye-candy ;-)
Put the Gnocchi onto a surface dusted with flour. Repeat with the remaining dough balls until all Gnocchi have been shaped. This does need a little practice, but there's plenty of that with 1kg of potatoes... and they don't need to be all perfect and identical, they still taste nice :-)
Cook:
Bring plenty of water to a boil, salt and put the Gnocchi inside, small portions at a time and shaking off access flour as much as possible. Reduce the heat a bit and leave to cook gently. When the Gnocchi are cooked - and this will take no more than a couple of minutes - they will rise to the surface. Spoon off with a slotted spoon and put into the prepared sauce. Stir well with the sauce and serve, sprinkled with a little freshly grated Parmesan.
In case the Gnocchi need to be frozen, place the freshly made Gnocchi in a single layer onto a tray that fits inside the freezer. Freeze until hard for a couple of hours - this will prevent them from sticking together later. Once hard, place the frozen Gnocchi into a freezer bag and freeze until use. They should keep for several weeks. Gnocchi can be boiled immediately from frozen, they will just take a couple of minutes longer to cook.
______________________________________________________
HOME-MADE POTATO GNOCCHI
1kg starchy potatoes (I read that red starchy ones are best as they hold the potato better in the skin during boiling and are more tasty, but I used normal white starchy ones for this recipe. Just make sure not to overcook them until their skin bursts)
300g '00' flour + additional for dusting
1 large egg
1 tsp salt
freshly grated nutmeg
additional salt for boiling
1) Boil and peel the potatoes: Wash the potatoes, then place them unpeeled in a large pot and cover with cold water - it is important to use cold water as the potato skins may split if they are put immediately into boiling water. Bring to the boil, then reduce the heat and cook the potatoes gently until they are soft and can be easily pierced with a skewer or knife. The potatoes should fall off the skewer after piercing, if they hold on, more cooking is needed. Drain the potatoes, then, holding the potatoes with a kitchen towel to protect the hand from burning, peel the skins off with a small knife while still hot. Make the dough immediately following the steps below.
2) Press the potatoes through a ricer: Put the peeled potatoes through a potato ricer - this will incorporate air, making the potatoes even fluffier. It is important that these initial steps are done very quickly, as the hotter the potatoes, the softer the Gnocchi will be.
3) Make the dough: Leave the riced potatoes to cool just a little, then add the egg and stir in quickly in order for the egg not to start cooking from the heat of the potatoes. Season with the salt and some freshly grated nutmeg and stir. Add some of the flour and start to stir gently into a dough-like texture, then put the mixture onto a work surface.
Add the remaining flour, little at a time, and knead very gently into a soft, smooth dough. Try not to overknead and handle too much as the dough will become more sticky and require even more flour. If the flour sticks to the work surface, use a dough scraper to scrape off the sticky bits and knead them back into the potatoes. The final flour amount depends on the type of potatoes used, the size of egg, etc. The dough should be smooth and very soft.
3) Shape the Gnocchi: Cut off a small piece of dough with a dough scraper or a knife. Dust the work surface, then roll the dough piece into a long rope, app. 2cm thick. Cut the rope into 2 cm pieces. Use the Gnocchi like this, or shape into traditional shape.
4) Shape Traditional Gnocchi: Flour your hands, then take each 2 cm piece from the step before one-by-one, place into a little flour and roll into a small ball. Roll it over the tines of a fork to make the typical Gnocchi pattern and shape: to do so, hold the fork with one hand, with the tines leaning on the work surface, and the forks concave side up, at a slight angel to the surface. Put the tip of your thumb into flour, then place one Gnocchi on a the top of the tines. Roll the Gnocchi downwards with the tip of your thumb, applying little pressure.
The Gnocchi will start to flatten underneath the thumb, but through the downward movement will also start to roll around the tip of the thumb in a circle-like motion into a C-shape. You want to end up with a small cavity inside the Gnocchi and the typical pattern created by the ridges on the other side. The rolling down movement closes the Gnocchi, or it can be pressed together a little at the end, leaving the small cavity inside. Put the Gnocchi onto a surface dusted with flour.
5) Finish with the remaining dough: Repeat with the remaining dough balls until all Gnocchi have been shaped. This does need a little practice, but there's plenty of that with 1kg of potatoes... and they don't need to be all perfect and identical, they still taste nice :-)
6) Cook the Gnocchi: Bring plenty of water to a boil, salt and put the Gnocchi inside, small portions at a time and shaking off access flour as much as possible. Reduce the heat a bit and leave to cook gently. When the Gnocchi are cooked - and this will take no more than a couple of minutes - they will rise to the surface. Spoon off with a slotted spoon and put into the prepared sauce. Stir well with the sauce and serve, sprinkled with a little freshly grated Parmesan.
Storing: In case the Gnocchi need to be frozen, place the freshly made Gnocchi in a single layer onto a tray that fits inside the freezer. Freeze until hard for a couple of hours - this will prevent them from sticking together later. Once hard, place the frozen Gnocchi into a freezer bag and freeze until use. They should keep for several weeks. Gnocchi can be boiled immediately from frozen, they will just take a couple of minutes longer to cook.
Subscribe to:
Posts (Atom)